Z Image Turbo Image to Image: Fast AI Editing
Speed and image quality almost never come together in the same model. You pick one and accept the tradeoff. Faster inference usually means softer outputs, blurry edges, or style inconsistencies that make the result look rushed. Z Image Turbo image to image breaks that rule in a way that's hard to dismiss once you've actually used it. Zhipu AI built this model to handle image transformations at speed, without the output looking like it took shortcuts to get there. That's a specific claim. A lot
Speed and image quality almost never come together in the same model. You pick one and accept the tradeoff. Faster inference usually means softer outputs, blurry edges, or style inconsistencies that make the result look rushed. Z Image Turbo image to image breaks that rule in a way that's hard to dismiss once you've actually used it. Zhipu AI built this model to handle image transformations at speed, without the output looking like it took shortcuts to get there.
That's a specific claim. A lot of models make it. What makes Z Image Turbo image to image different is that it holds up when you push it. Across different subjects, different transformation types, different strength levels. The results stay sharp. The details hold. And you don't end up waiting between attempts.
What Is Z Image Turbo Image to Image?
At its core, Z Image Turbo image to image does one thing: it takes a reference image you provide and transforms it based on a text prompt. The structural composition of the original stays intact: the layout, the shapes, the general spatial arrangement. What changes is the visual content: the style, the environment, the lighting, the mood. How much changes depends on one number you control.
That number is the strength parameter. It runs from 0.0 to 1.0, and it determines how aggressively the model departs from your reference. Keep it low and the model is essentially doing a sophisticated enhancement pass. The original is clearly recognizable, and the edit feels like a refinement. Push it higher and the transformation gets bolder. At the top of the range, the reference is more of a compositional guide than a strict template, and the prompt takes over.
What's genuinely useful about this setup is that you're not switching between tools depending on what kind of edit you need. Subtle retouching, style transfers, scene replacements, creative variations. Z Image Turbo image to image handles all of it through the same interface. You adjust one parameter and the model's behavior shifts accordingly. That simplicity matters a lot once you're actually working at volume.
There's also a built-in prompt enhancer that processes your input text before it reaches the model. If you know what you want but can't quite phrase it right, or if you're just moving fast and writing rough prompts, the enhancer fills in the gaps. It doesn't override your intent. It just helps the model understand what you actually meant.
How Z Image Turbo Image to Image Works
The speed comes from the model's underlying architecture. Standard diffusion models run through a large number of inference steps to produce a finished output. Each step refines the image further. More steps means more compute, more time per generation, and higher latency between your prompt and your result. Z Image Turbo image to image cuts that step count down significantly. The result is generation that's fast enough to keep up with how you think.
That matters more than it sounds. When you're iterating on a creative direction, the gap between attempt and result shapes how you work. If each generation takes a minute, you make cautious choices. You try to nail it in fewer attempts because waiting is expensive. When that gap shrinks to seconds, you experiment more freely. You try things you're not sure about. You adjust and go again without losing momentum.
The strength parameter is what gives you creative control across the model's range. Think of it less as a single dial and more as a mode selector that also lets you fine-tune between modes. Low values keep the model close to the reference and use the prompt to guide refinements. Mid-range values open up more creative territory while still respecting the original composition. High values push the model into genuine reimagining. The reference provides the bones, and the prompt shapes everything else.
The prompt enhancer works silently in the background. Most users won't notice it's there, which is exactly how it should work. You write a prompt, the enhancer cleans it up, and the model processes a more precise version of what you intended. For workflows where speed matters and prompts get written quickly, that's worth more than it sounds.
Key Features of Z Image Turbo Image to Image
It's Actually Fast
Not "fast for its size" or "fast considering the quality." Just fast. The step reduction in the architecture produces inference times that change how you approach the editing process. You're not rationing attempts. You're not waiting. You try something, you see it, you adjust. The feedback loop is short enough that the model feels interactive rather than transactional.
For developers building image workflows or APIs, this changes the architecture of what's possible. Real-time or near-real-time transformations at production volume require models that can keep up. Z Image Turbo image to image is designed for that, not just for one-off playground testing.
Strength Parameter Does the Heavy Lifting
The 0.0 to 1.0 range isn't a gimmick. It's genuinely continuous and granular, and the behavior across the range is predictable enough to use deliberately. Low values stay close to the reference. Mid-range values balance prompt influence and reference fidelity. High values push toward creative reimagining where the composition is the only thing that carries over.
What makes this practically useful is that you're running the same model for every type of transformation. You're not managing one tool for touch-ups and a different one for dramatic edits. The same Z Image Turbo image to image model handles both ends of the spectrum. You just set the number differently. Over the course of a real workflow, that consolidation adds up.
Prompt Enhancer Built In
The prompt enhancer is active by default and works quietly behind your input text. Before the model processes your prompt, the enhancer refines the wording to make the model's interpretation more accurate. If you type a quick rough prompt because you're moving fast, the enhancer helps the model understand what you actually meant rather than processing a literal but incomplete instruction.
It's worth leaving on. The cases where you'd want to turn it off are specific. Situations where you're testing prompt behavior deliberately and need to isolate the model's response to unenhanced input. For most practical use, the enhancer is an asset, not a complication.
LoRA Support in the Image-to-Image LoRA Variant
The LoRA variant of Z Image Turbo image to image adds custom LoRA adapter support on top of the base model's transformation capabilities. If you need a specific visual style to carry through your outputs consistently, whether that's a trained aesthetic, a brand identity, or a particular artistic direction, you can load those LoRA adapters into the pipeline and they'll shape the output alongside your prompt.
The structural fidelity from the reference image stays. The LoRA shapes the style. Strength still controls overall transformation intensity. The three inputs work together rather than competing, which gives you a lot of control without a lot of complexity. For production workflows where consistency across a large volume of outputs matters, this variant is worth knowing about.
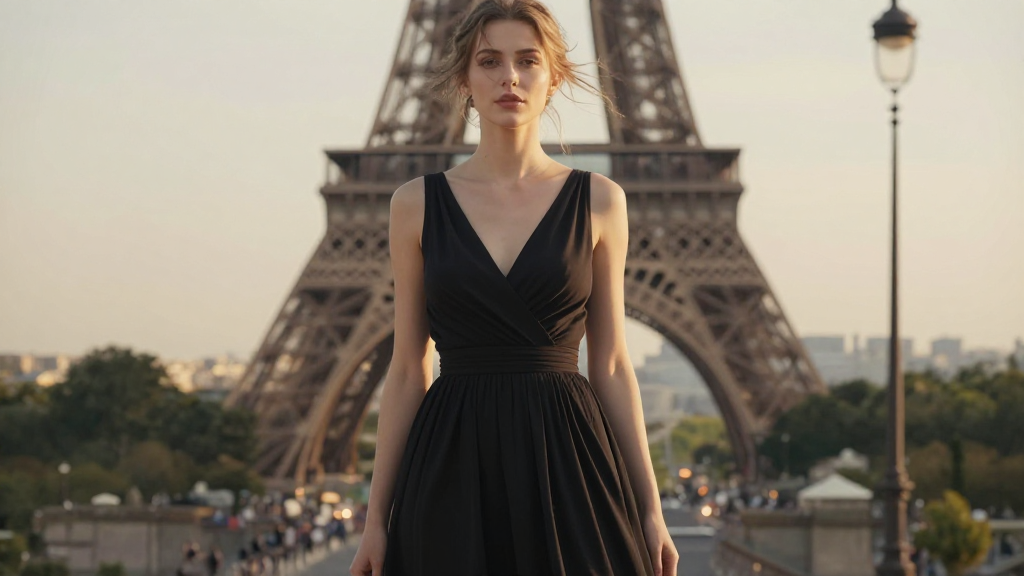
Photorealistic Output Quality
Across the strength range and across different subject types, Z Image Turbo image to image produces photorealistic results consistently. The architecture isn't tuned for stylized or illustrated outputs by default. It's built to produce images that look real, with accurate lighting, sharp textures, and coherent spatial relationships. That's not a given in fast diffusion models, where quality often degrades at the edges of the strength range or under complex prompt conditions.
For e-commerce imagery, lifestyle photography editing, and any workflow where the output needs to look like something a camera could have captured, that photorealism is central to whether the model is actually usable.
Real-World Use Cases
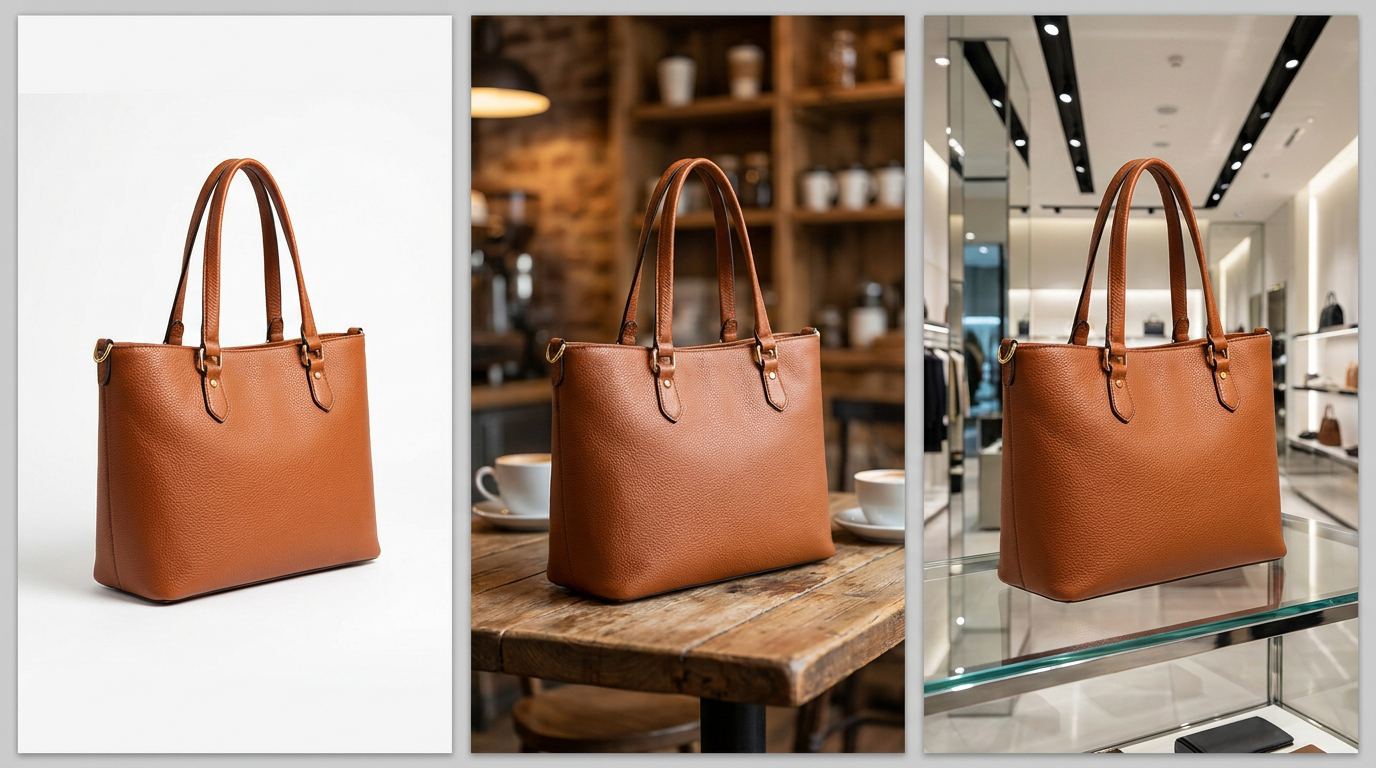
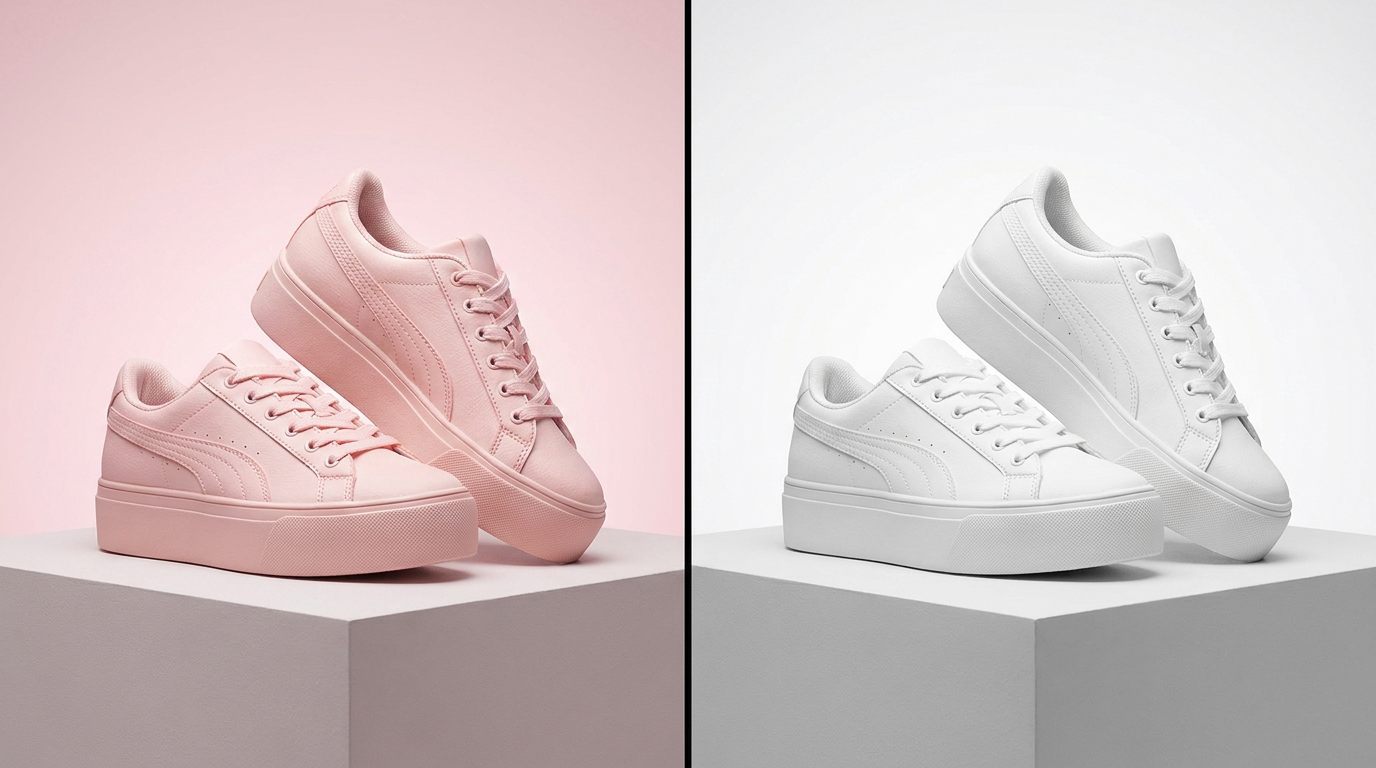
E-commerce is one of the strongest fits. Product photography is expensive and time-consuming to produce at volume. Shooting the same product in multiple environments, with different lighting setups, against different backgrounds is a significant logistics problem. Z Image Turbo image to image at low strength lets you transform the scene around a product without the product itself drifting. The thing you're selling stays sharp and recognizable. The world around it changes to match whatever context you need.
Design teams running rapid concept iteration have a similar use case. You have a reference image that's close to what you want. You write a prompt describing the direction you want to push it. Seconds later you have a result. You adjust the prompt or the strength and go again. The idea-to-output loop is short enough that you can actually explore options rather than committing early and waiting a long time between each test.
Developers building image editing tools, creative APIs, or content automation pipelines need models that can sustain production volume without breaking the user experience. Z Image Turbo image to image is built for exactly that. The API through Eachlabs is straightforward, and the output quality is consistent enough to surface directly to end users without a manual review step for most transformation types.
Content creators working with visual assets regularly, for social media, for editorial, for client work, can use Z Image Turbo image to image for style transfers, quick scene changes, and visual refinements that would otherwise require significant manual work in post-production. The prompt enhancer means rough prompts still produce usable results, which matters when you're working fast.
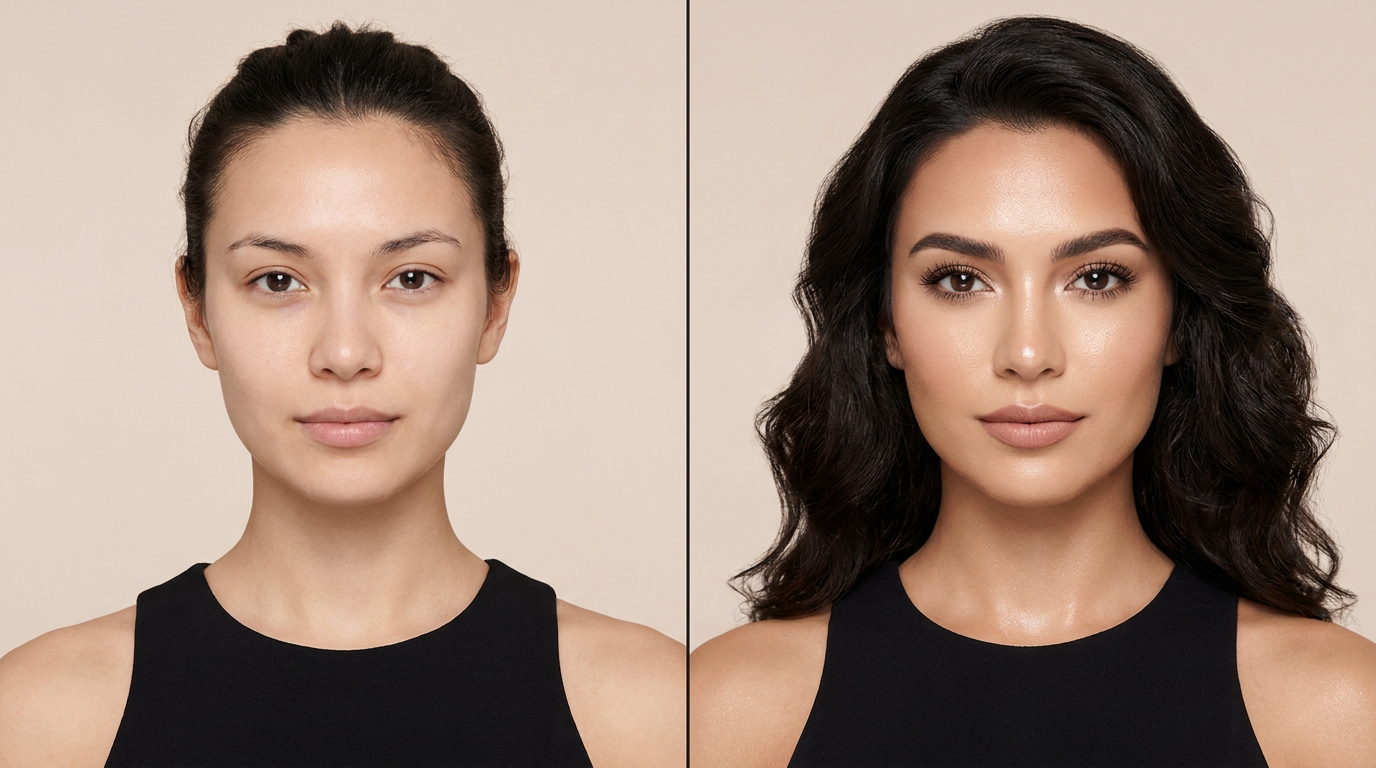
Visual artists and photographers exploring creative directions can use the high-strength range to generate genuine variations from a reference image. Not just retouches, but compositionally related alternatives that explore different visual possibilities while maintaining structural coherence with the original.
Z Image Turbo Image to Image vs. Standard Diffusion Models
The comparison that matters most is the step count. Standard diffusion models run through a large number of refinement steps to produce finished output. Each step costs compute and time. Z Image Turbo image to image runs significantly fewer steps. That reduction is what produces the speed advantage, and it's not marginal.
At small scale the difference is noticeable. At production scale it becomes substantial. If you're processing hundreds or thousands of transformations in a pipeline, the cumulative time savings and compute efficiency of a faster model compound quickly. The architectural efficiency is the headline feature, even though the output quality often gets more attention in casual comparisons.
The strength parameter range is also worth comparing. Many standard models offer strength control, but the granularity and behavioral consistency across the range varies. Z Image Turbo image to image gives you a continuous dial from subtle enhancement to full creative reimagining, with predictable behavior across the range. That predictability is what lets you use it deliberately rather than just exploring and hoping the output matches your intent.
On output quality, the gap between Z Image Turbo image to image and heavier standard models is narrower than you'd expect from the speed difference. The photorealistic output holds up under different subject conditions and across the strength range. That's the core claim of the Turbo architecture: speed without proportional quality degradation.
How to Use Z Image Turbo Image to Image on Eachlabs
Z Image Turbo image to image is live on Eachlabs through both the playground and the API. If you want to test without writing any code, the playground is the right starting point. Upload your reference image, write your prompt, set the strength where you want it, and run it. Results come back fast enough that you can iterate on the spot.

Tips for Getting the Best Results
Start at 0.5 and Adjust From There
If you're not sure where to set strength, 0.5 is a reliable starting point. The reference structure has real influence at that level but doesn't dominate, and your prompt has room to shape the result meaningfully. From there, go up if the transformation feels too restrained, down if the output is drifting too far from the reference. You'll calibrate to your specific use case quickly.
Write Specific Prompts
The prompt enhancer helps when your wording is rough, but it works better with something real to refine. Describe the lighting conditions you want. Name the style explicitly. Be specific about the changes you're targeting. Prompts that describe a general direction produce more variable results than prompts that describe a specific outcome. The model responds to detail, and detail is cheap to add.
Keep Strength Low for Product and Subject Images
For e-commerce or any use case where the primary subject needs to stay recognizable, stay under 0.4. That range lets the background, environment, and context change significantly while keeping the subject's details intact. The product doesn't drift. The scene around it can change completely. That's the sweet spot for commercial product image editing.
Push Strength High for Creative Variations
If you're using the reference primarily for compositional guidance rather than strict visual fidelity, push above 0.7. The general layout stays informed by the reference. The prompt takes over the style, the content, and the mood. At 0.8 or 0.9, you're generating images that are compositionally related to the reference but visually transformed. That's a genuinely different use case than subtle editing, and it's one Z Image Turbo image to image handles well.
Try the LoRA Variant for Consistent Style Across a Set
If you're producing a batch of images that need to share a visual identity, whether that's an editorial style, a brand aesthetic, or a specific artistic direction, the LoRA variant is worth the additional setup. You load a trained LoRA adapter once and it shapes every output in the session. Prompt-to-prompt consistency gets harder to maintain at volume. The LoRA approach gives you a more reliable mechanism for style consistency than prompt engineering alone.
Wrapping Up
Z Image Turbo image to image earns its place in any image editing workflow that cares about speed without wanting to give up output quality. The strength parameter is the kind of control that actually simplifies a workflow rather than adding to it. One model, one number, a wide range of outcomes. Whether you're doing subtle product retouches at low strength or pushing into creative territory at the high end, the model handles both without switching tools. Try Z Image Turbo image to image on Eachlabs and see how quickly a reference image can become something completely different.
Frequently Asked Questions
What's the difference between the base Z Image Turbo image to image model and the LoRA variant?
The LoRA variant adds something the base model doesn't have: the ability to load custom trained adapters that shape the style of your output independently of prompting. For transformations where consistent visual identity matters across a large number of outputs, whether that's a trained brand aesthetic, a specific artistic style, or a particular photographic look, the LoRA variant gives you a more reliable mechanism than prompt engineering alone. The base Z Image Turbo image to image model is the right choice for most use cases, especially when you just need fast, high-quality transformations and don't have custom LoRA adapters ready. The LoRA variant is for when you do.
How does strength setting affect the actual output quality?
Strength controls transformation intensity, not quality directly. What you're adjusting is how much creative latitude the model takes with your reference image. At low values, the model enhances without dramatically changing composition. At high values, the model uses the reference as a structural guide and lets the prompt reshape the visual content. Quality stays consistent across the range. What changes is how far the output departs from the original. Sharpness, texture coherence, and photorealistic rendering hold up at both ends, which isn't always true of other image-to-image models.
Does Z Image Turbo image to image work well for high-volume production pipelines?
That's arguably where it performs best. The architecture is optimized for fast inference, which means the per-image processing time is low enough to sustain production-level volume without the compute cost becoming prohibitive. The API on Eachlabs is clean and consistent, and the output quality is predictable enough across different input types that you can use Z Image Turbo image to image in pipelines that surface results directly to end users. For one-off creative exploration it's also strong, but the production volume use case is where the speed advantage compounds most noticeably.