The Most Effective Ways to Use AI Image Editing Models
AI is changing how we edit pictures, making things faster and opening up new creative paths. It used to take ages to get certain edits done, but now, with AI tools, it's much quicker. Whether you're just snapping photos on your phone or working on professional projects, knowing how to use these AI edit image tools can really help. This guide will show you the basics and some practical ways to use AI for your images, so you can get better results without all the hassle. Key Takeaways * Focus
AI is changing how we edit pictures, making things faster and opening up new creative paths. It used to take ages to get certain edits done, but now, with AI tools, it's much quicker. Whether you're just snapping photos on your phone or working on professional projects, knowing how to use these AI edit image tools can really help. This guide will show you the basics and some practical ways to use AI for your images, so you can get better results without all the hassle.
Key Takeaways
- Focus on improving basic image quality and fixing details, like making blurry parts clear or cleaning up old photos. AI edit image tools are great for this.
- Use AI to change or move things in your pictures, like removing unwanted items or adjusting people's features. This can make your ai edit image look much better.
- Think about which AI edit image tools fit what you need to do and how to make your edits look natural, not overdone.
Mastering Core AI Edit Image Capabilities
AI image editing tools have really changed the game, making complex edits that used to take ages now doable in just a few clicks. We're talking about the basics here, the stuff that forms the foundation for almost any image work you'll do.
Enhancing Image Quality and Restoring Details
Ever look at an old photo and wish you could just... make it better? AI is pretty good at that now. It can look at a fuzzy or grainy picture and bring back details you thought were lost forever. This isn't just about making things look sharper; it's about bringing clarity back to images that might have suffered from poor lighting, low resolution, or just the passage of time. AI can intelligently reduce noise, sharpen edges without making them look weirdly artificial, and fix color imbalances. It's like giving your photos a fresh coat of paint, but way more sophisticated.
- Noise Reduction: AI algorithms can identify and remove unwanted graininess, especially noticeable in low-light shots, while trying to keep the actual image details intact.
- Sharpening: It can intelligently sharpen areas that are a bit soft, making textures and edges more defined.
- Color Correction: AI can analyze the colors in an image and adjust them to look more natural and balanced, fixing issues like a photo looking too blue or too yellow.
- Upscaling: Need a bigger version of a small image? AI can often enlarge images, adding detail that wasn't there before, making them suitable for printing or larger displays.
The goal with these quality enhancements is to make the image look its best without making it seem like it's been heavily edited. It's about bringing out the original potential of the photograph.
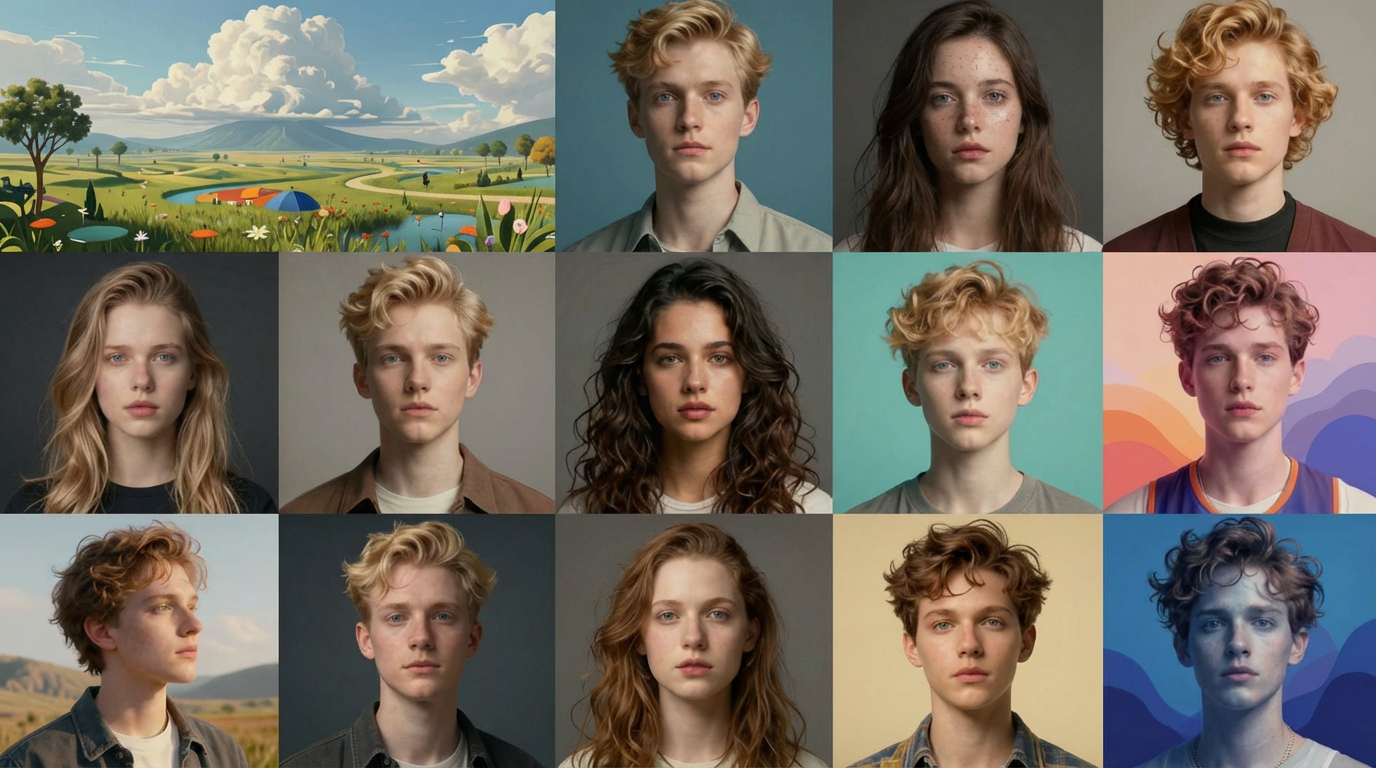
Seamless Object and Person Manipulation
This is where AI really starts to feel like magic. Need to remove something from a photo? Or maybe change a person's appearance slightly? AI can handle it. Think about getting rid of that distracting photobomber in the background or cleaning up a product shot by removing a small blemish. For portraits, AI can subtly refine facial features or even adjust body shapes, though it's important to use these features thoughtfully to maintain a natural look.
- Object Removal: AI can identify and erase unwanted objects, filling in the background so it looks like the object was never there. This works best when the background isn't too complex.
- Person Editing: This can include things like smoothing skin, whitening teeth, or even making subtle adjustments to body shape. The key is subtlety; overdoing it can look very unnatural.
- Background Replacement: AI is excellent at separating a subject from its background, allowing you to place them into a completely new scene with relative ease.
The ability to precisely select and modify specific elements within an image is a game-changer for both casual users and professionals. It opens up a lot of creative possibilities and saves a ton of time compared to traditional methods.
Leveraging Advanced AI Edit Image Techniques
Beyond the basics, AI image editing opens up some really cool creative avenues. We're talking about making images look like paintings or generating entirely new elements that weren't there before. It's where things get exciting, moving from simple fixes to genuine artistic expression.
Transforming Images with Style Transfer and Artistic Effects
Ever seen a photo and thought, "I wish this looked like a Van Gogh painting"? Well, now you can. Style transfer is a neat AI trick that takes the artistic style from one image – say, a famous painting – and applies it to your own photograph. It's not just about making things look old or artsy; you can turn a regular portrait into a cartoon, a sketch, or even mimic the look of a specific era. This is fantastic for creating unique social media content or giving your personal photos a distinctive flair. You can experiment with different styles to see what fits best.
- Oil Painting: Mimics brushstrokes and texture.
- Watercolor: Creates a softer, blended look.
- Sketch: Converts images to pencil or charcoal drawings.
- Vintage Film: Applies the look of old photographs.
The key here is to play around. Don't be afraid to try styles that seem unusual at first. Sometimes the most unexpected combinations yield the most interesting results. It’s about exploring the visual possibilities and finding a look that truly stands out.
Utilizing Generative AI for Creative Content
Generative AI goes beyond simple image edits by enabling the creation of entirely new content. With Eachlabs, you can generate new objects, textures, or backgrounds using different models and workflows from a single platform. This is especially useful for e-commerce teams showcasing products in multiple settings and for designers who need unique creative assets quickly. By experimenting with various models and workflows, creators can iterate faster and produce high-quality, production-ready visuals with ease.
Here’s a quick look at what generative AI can do:
- Inpainting: Filling in missing or unwanted areas of an image realistically.
- Outpainting: Extending an image beyond its original borders, creating a larger scene.
- Variations: Generating multiple different versions of an image based on an initial input.
- Texture Generation: Creating realistic surfaces like wood, fabric, or metal.
When using these advanced techniques, remember that consistency is often key, especially if you're working with a series of images. Keeping a record of settings or using batch processing for similar edits can save a lot of time. It's also wise to understand the limitations of each tool; sometimes a bit of manual touch-up after the AI does its work can make all the difference.
Optimizing Your AI Edit Image Workflow
So, you've been playing around with AI image editing, huh? It's pretty wild what these tools can do, but sometimes it feels like you're just throwing things at the wall to see what sticks. To really get the most out of it, you need a bit of a plan. It’s not just about clicking buttons; it’s about working smarter, not harder.
Selecting the Right AI Tools for Your Needs
First off, there are a ton of AI editing tools out there, and they're not all created equal. Trying to use a tool that's meant for, say, background removal on a complex texture job is just going to lead to frustration. You gotta figure out what you actually need the AI to do.
- What's your main goal? Are you trying to clean up old photos, make product shots pop for your online store, or maybe create some wild art? Different tools are built for different jobs.
- How easy is it to use? Some AI editors are super simple, almost plug-and-play. Others have a steeper learning curve, but they might give you more control. Think about how much time you want to spend figuring things out.
- What's the quality like? Does the tool spit out high-resolution images, or does everything look a bit fuzzy? Check out examples if you can.
- Does it cost money? Lots of great tools have free versions, but sometimes the paid ones offer way more features or better results. It's a trade-off.
Choosing the right tool upfront saves you a ton of time and headaches later. It's like picking the right screwdriver for the job – you wouldn't use a butter knife to tighten a screw, right?
Best Practices for Natural and Effective Edits
Okay, you've got your tool. Now, how do you make sure your edits don't look like, well, AI edits? The goal is usually to make things look better, not weirder.
- Start with Good Material: If you feed the AI a blurry, poorly lit photo, it's going to struggle. Use the best quality image you have. Higher resolution usually means better results.
- Don't Overdo It: This is a big one. AI can sometimes go a little overboard with sharpening or smoothing. Dial back the intensity if things start looking plastic or fake. Subtle changes are often more effective.
- Understand the Limits: AI is amazing, but it's not magic. Sometimes, it'll mess up, especially with tricky details like hair or complex backgrounds. Be prepared to do some manual touch-ups or try a different approach.
- Think About the Final Use: Where will this image end up? A picture for Instagram might need a different treatment than one for a printed brochure. File size and overall look matter.
Sometimes, the best AI edit is the one you can barely notice. It should feel like a natural improvement, not a drastic alteration. Think about what looks real and believable in the context of the image.
Here's a quick rundown of common issues and how to tackle them:
| Problem | Potential Solutions |
|---|---|
| Unnatural skin smoothing | Reduce intensity, use AI for subtle retouching, combine with manual adjustments. |
| Weird artifacts/halos | Try a different AI model, use edge refinement tools, or manual cleanup. |
| Loss of fine detail | Start with higher resolution, check output settings, use AI upscaling if needed. |
| Inconsistent results | Use batch processing for similar images, save and reuse successful settings. |
Want to make your AI image editing faster and better? Our tools help you get amazing results quickly. Learn how to speed up your workflow and create stunning images. Visit our website today to discover the best AI solutions for your projects!
Wrapping It Up
So, we've gone over a bunch of ways AI can help make your pictures look better, faster. It's pretty wild how much these tools can do, from fixing up old photos to making product shots pop. Remember, AI is like a super helpful assistant, but it's still your vision that counts. The best results usually come when you mix what the AI can do with your own ideas. Keep playing around with these tools, see what works for you, and don't be afraid to try new things. The world of image editing is always changing, and AI is a big part of that now.
Frequently Asked Questions
What are the most common problems with pictures made by AI?
Pictures made by AI can sometimes look a bit off. Common issues include weirdly shaped hands, shadows that don't look right, or textures that seem off. This happens because the AI learns from patterns in data, not from real-world understanding. You might also see fuzzy spots or blurry edges sometimes.
What are the easiest tools for beginners to edit AI pictures?
If you’re just starting out, beginner-friendly AI models like Nano Banana Pro Edit is a great option for quick and simple image edits such as resizing, color adjustments, and basic visual enhancements. For users who want to explore more creative edits and variations, models like ByteDance Seedream allow you to experiment with different styles and outputs while keeping the workflows easy to manage. As your needs grow, using these models within flexible workflows helps you scale from basic edits to more advanced, production-ready visuals.
How can I make AI pictures look more real?
To make AI pictures look more real, focus on the small details. Make sure the edges, colors, and textures look natural. Use tools to sharpen blurry parts and adjust the brightness and contrast so it looks like a real photo. Adding subtle textures can also help a lot.